
Sometimes you need to move a WordPress site from a folder to the root. Why would you move a WordPress site from a folder to the root? Well, in some cases, WordPress has been installed into a folder, and the root was redirected to that folder via htaccess. Google doesn’t like empty roots… So for this tutorial we are going to move www.entrepreneurship-interviews.com/blog to www.entrepreneurship-interviews.com so you should replace these with your URL throughout the work.
Steps to move a WordPress site from a folder to root
- making a database backup
- move the files
- change the htaccess
- change the database
- change the links in the database to the new location
- 301 redirect to keep the SEO
- notify google about the changes
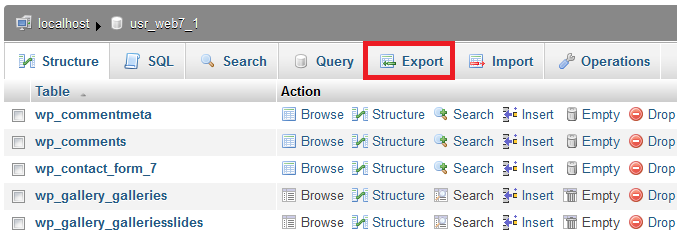
1. Making a database backup
For this migration, making a database backup is not just a way to sleep better at night, it’s mandatory. There are at least 2 ways in which you can break the database during the migration process, and it will HAPPEN. Good news is that it’s very easy to do a database backup if your hosting company has provided you with phpMyAdmin (most do). So fire up phpMyAdmin in your browser and look for the “Export” button.
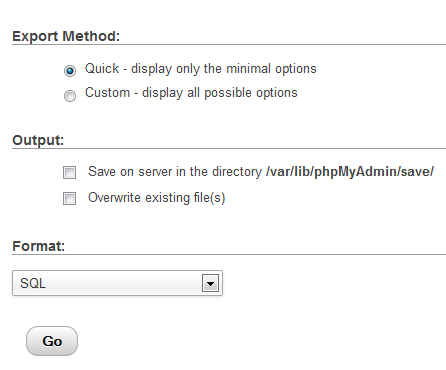
This will open the Export view, where I suggest you go with the Quick option. This will save your database in SQL format on your desktop. Good, now if something happens (and it will) you can import the backup!
2. Moving the files
Now, if you FTP to your site, you probably have files more or less similar with the below screenshot: a folder where you currently have the blog, and some files in the root.
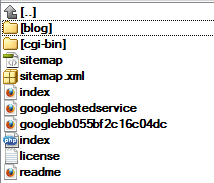
If you don’t need the files in the root to work anymore, then it’s quite easy: you should copy all the content in the “blog” folder to the root, except the .htaccess file. The reason you don’t have to copy the .htaccess file is that the .htaccess file in the root might contain redirect rules, or other rules you don’t want to lose. So let’s see how to change the htaccess file.
Note: if you only have FTP access, you need to copy all the files on the desktop then upload them back to the root of your site.
3. Changing the htaccess file
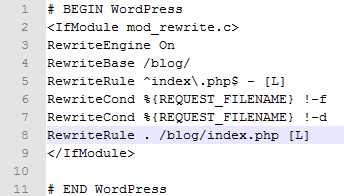
OK, so you basically have 2 htaccess files. One in the “blog” folder and one in the root folder. The .htaccess file in the blog folder looks probably like the screenshot below (the standard permalinks structure and the rewriteBase in the /blog folder.
And the .htaccess file in the root probably contains the rules to redirect from www.entrepreneurship-interviews.com to www.entrepreneurship-interviews.com/blog
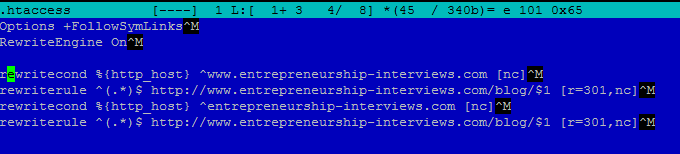
Good. We have to mix these in the root .htaccess file. We will simply add the WordPress standard rules below the redirect rules:

Let’s remove the referenced to the blog folder. Change RewriteBase to / and RewriteRule to ./index.php.
Note: we won’t remove the redirect to /blog just now. Let’s do the database change first.
4. Changing the database (changing the blog location)
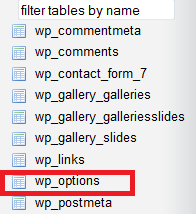
There are two main locations you should change: the siteurl and the home. Fire up phpMyadmin and on the left side, look for the wp_options table
On the first page you will see the siteurl field, remove the /blog folder

And most probably, on the second page, the home url (likewise, remove the /blog folder

We are all set. Let’s remove the redirect to /blog in the root .htaccess file and give it a try. To do this, open the root .htaccess file and put a # in front of the 4 rules that redirect everything to /blog. Check if the site is working in the root.
Note: Firefox will remember the redirect to the /blog folder so you should first clear the cache.
5. change the links in the database to the new location
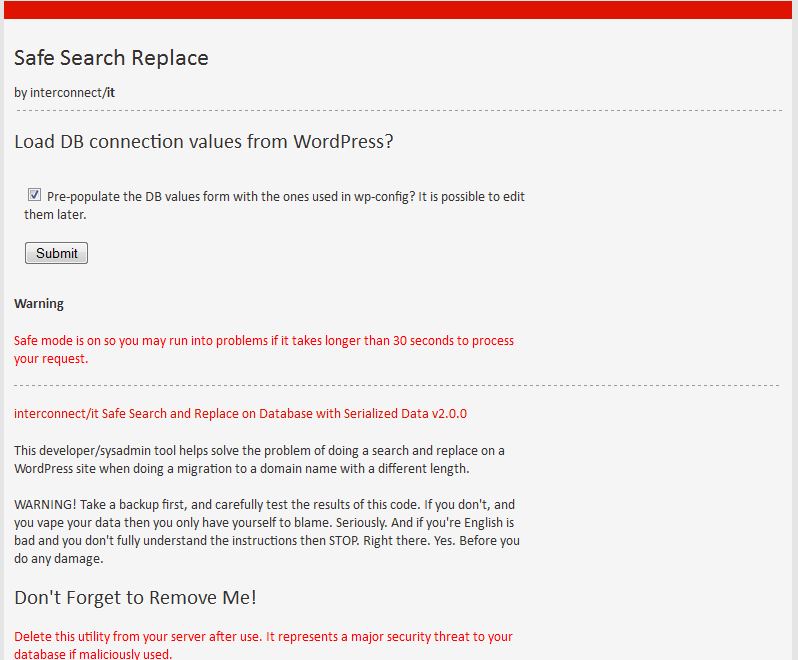
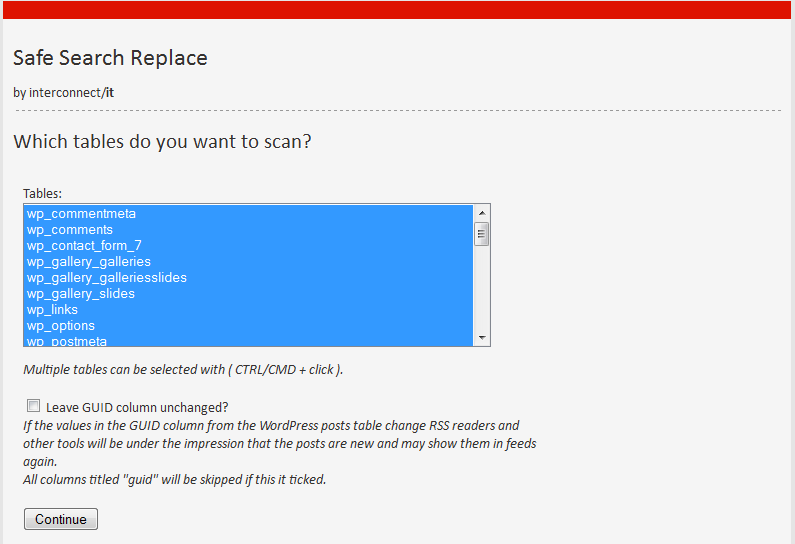
OK. now the site is working but if you look at any content image (or other resources added via the dashboard) you will see they still reference the /blog folder. The reason is that when uploading a media file, WordPress saves the full URL to the database. Of course you can live the “uploads” folder in the /blog/wp-content/uploads/ folder and everything will still work. But the new images will be uploaded to /wp-content/uploads (in the root) and that will tend to create a mess (duplicate files and so on). So right now we need a tool to check all the content in the database and replace the www.entrepreneurship-interviews.com/blog/something with www.entrepreneurship-interviews.com/something The good news is that we have tools! One of these tools is the “WordPress (and others) Search and Replace Tool“. Download the file and upload it to the root, and rename it (for security purposes). I have renamed it db2.php so you can access it with www.yoursite.com/db2.php. This is how the first screen looks like (it will read the wp-config database details so no setting to be done by you):
In the next screen you will have to input the old WordPress site address and the root address (watch for the way I put he ending /)
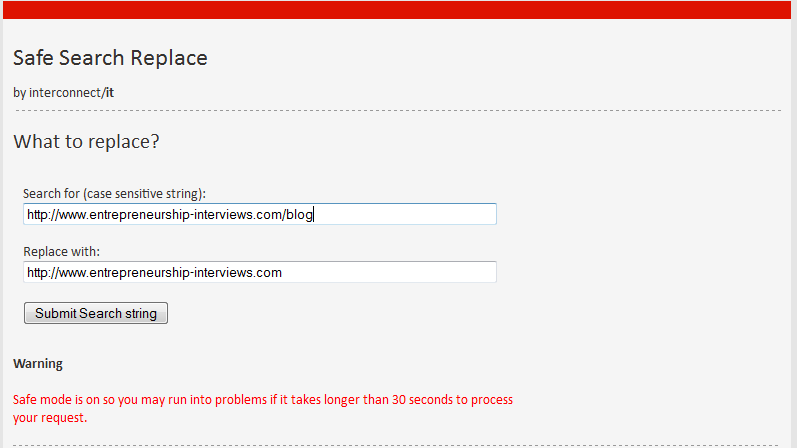
This will look throughout the database and replace the old URLs containing /blog with the root address (I scanned all the database tables like in the screenshow below).
Now it should be all in place and you can delete all the files in the /blog folder.
Note: if you have missing files, or something stopped working, you should restore the database backup you made at step 1
6. 301 redirect to keep the SEO
Now, one of the very important steps in moving a WordPress site from a folder to root is to minimize the SEO loss caused by the moving of files. What happens is that Google looks for URLs (or people come to your site via URLS) that look like www.entrepreneurship-interviews.com/blog/something As we don’t have the blog located in the /blog folder, these visits will turn into 404 and you will lose traffic and Google will penalize also. The workaround this is to make 301 redirects between the old URLs and the new location. It seems that with a 301 redirect you will get almost 90% of the SEO juice of the original links. And the good news is that you don’t have to go URL by URL, you can work it out with only 1 line in the .htaccess file. SO edit the htaccess file and add at the end (you can also remove completely the redirect to /blog lines wich we previously commented with #) redirectmacth 301 /blog/(.*) https://www.entrepreneurship-interviews.com/$1

Let check if it’s working. Open the blog and go to a page www.entrepreneurship-interviews.com/something. It’s working right? Now add /blog/ like this www.entrepreneurship-interviews.com/blog/something and see if it’s redirecting to www.entrepreneurship-interviews.com/something. If it does, it means the redirect is working.
7. notify google about the changes
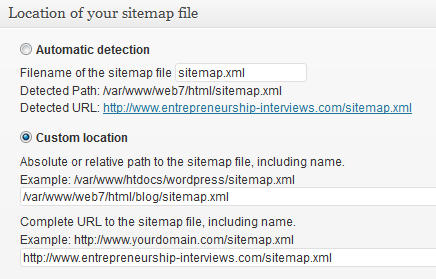
You can propagate the location change in 2 ways. Wait for Google to do it’s indexing (when they spider the content as usual they will start indexing the new URLs based on the 301 redirect) or you could go the fast way, by submitting a sitemap to Google Webmaster tools. It’s better to submit a sitemap because Google Webmaster tools will also report broken links or any other problems caused by the change of location. In my case I already had the Google (XML) sitemaps generator plugin installed, so I will show you which changes you need to do (if you don’t have it installed, go ahead and use it fresh to submit the new URLS to google)
- change the XML file location (remove /blog from the custom location path)

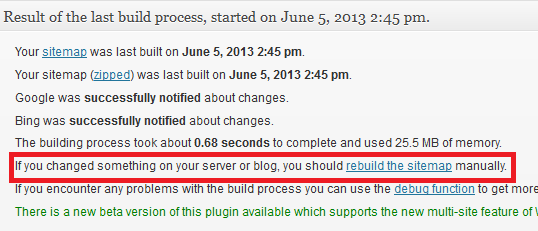
- Manually rebuild the sitemap

Now we’re talking! Not only that we have completely moved the WordPress site to the root location, but we also handled the SEO issue of having new URLs locations!